




Introduction
A cracked or warped cylinder block doesn’t just reduce engine output — it stalls your workflow, ties up a bay, and risks a comeback. For professional repair shops, dealers, and parts distributors, the ability to diagnose block failure quickly and execute a replacement efficiently is a direct driver of shop profitability.
This guide walks through the full process: how to identify when a block is beyond saving, the step-by-step replacement procedure used in professional environments, and the sourcing decisions that separate a reliable rebuild from a return job.
What Is a Cylinder Block — and Why Does the Type Matter?
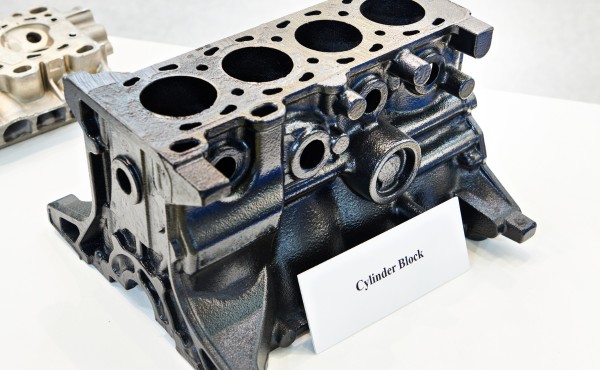
The cylinder block (often called the engine block) is the structural backbone of any internal combustion engine. It houses the cylinders, supports the crankshaft, and channels coolant and oil through precision-machined passages. When a block fails, the entire engine assembly is compromised.
For B2B buyers, two distinctions matter when sourcing replacements:
OEM vs. Aftermarket Blocks
OEM blocks are manufactured to the original factory specifications — identical materials, tolerances, and casting processes. They’re the safe choice when warranty compliance or brand-specific standards are non-negotiable.
Aftermarket blocks, when sourced from a reputable manufacturer, can match or exceed OEM quality. They often offer material upgrades (such as improved alloy compositions for better thermal resistance), shorter lead times, and more competitive pricing — particularly at volume. The key is vetting the supplier’s quality control, not assuming “aftermarket” means “inferior.”
Short Block vs. Long Block
A short block includes the cylinder block, crankshaft, connecting rods, and pistons — essentially the rotating assembly. A long block adds the cylinder head(s), valvetrain, timing components, and often the oil pump and water pump.
For high-volume shops, long blocks reduce labor hours and assembly errors significantly. Short blocks make more sense when the existing cylinder heads and valvetrain components are still within spec and the shop has experienced machinists on staff.
When to Replace a Cylinder Block
Recognizing Common Failure Modes
Not every block failure is obvious. Some symptoms develop gradually and only show up under load or at operating temperature. Here’s what experienced technicians watch for:
- Coolant-to-oil contamination: Cracks in coolant jacket walls allow cross-contamination. If you’re seeing milky oil or unexplained coolant loss with no external leak, the block is a likely suspect — especially after the head gasket has been ruled out.
- Thermal distortion: Sustained coolant temperatures above 120°C (248°F) can warp aluminum blocks and stress-crack cast iron. The damage is often invisible externally but shows up as persistent head gasket failures or uneven compression readings.
- Cylinder bore wear beyond service limits: Most manufacturers specify a maximum bore wear of 0.05–0.08 mm (0.002–0.003 in). Beyond this, piston ring seal degrades, oil consumption increases, and compression drops below usable levels.
- Structural cracking: Main bearing saddle cracks, deck surface cracks propagating from bolt holes, and freeze plug bore erosion are all structural failures that no amount of machining can reliably fix.
Professional Inspection Methods
Visual inspection catches the obvious damage. The failures that cause comebacks are the ones you can’t see. A proper block assessment includes:
- Dye penetrant or magnetic particle inspection to detect surface and near-surface cracks — particularly around cylinder walls, coolant passages, and main bearing journals.
- Pressure testing the coolant jacket (typically at 1.0–1.5 bar / 15–22 psi) to confirm waterway integrity.
- Bore gauge measurements at the top, middle, and bottom of each cylinder, in both thrust and non-thrust directions, compared against the OEM service manual’s wear limits.
- Deck surface flatness check using a precision straightedge and feeler gauge set. Most manufacturers specify a maximum variance of 0.05 mm (0.002 in) across the full deck surface. If using a CMM, tighter tolerances can be verified.
- Main bearing bore alignment check to detect saddle distortion from overheating or main cap bolt fatigue.
Repair vs. Replace: Making the Right Call
The decision isn’t always straightforward. This framework helps:
| Factor | Repair (Machining / Sleeving) | Replace (New Block) |
|---|---|---|
| Cylinder bore wear | Within 0.5 mm of max oversize; can be bored and re-ringed | Beyond maximum oversize or egg-shaped beyond correction |
| Deck surface | Warpage under 0.15 mm; can be resurfaced | Warpage beyond 0.15 mm or surface cracking present |
| Cracks | Small, non-structural surface cracks in low-stress areas (rare) | Any crack in the main bearing saddle, cylinder wall, or coolant jacket |
| Typical labor cost | 4–8 hours machining + reassembly | 8–14 hours for full swap, but outcome is predictable |
| Risk of comeback | Moderate — depends on crack repair success and machinist skill | Low — assuming correct part and proper assembly |
| Best for | Low-volume, budget-sensitive repairs where downtime isn’t critical | High-volume shops, fleet work, or any job where reliability is the priority |
The real-world calculation: In many professional shops, labor rates mean the machining option isn’t actually cheaper once you factor in diagnostic time, machine shop turnaround, and the risk of re-doing the job. For fleet and dealer work, a new block — especially sourced at volume pricing — is often the faster path to a reliable outcome.
How to Replace a Cylinder Block: Professional Workflow
Preparation
Cutting corners in preparation is where most assembly errors originate. Before the engine comes apart:
- Confirm the replacement block matches the original by engine code, production year, and application. Even within the same engine family, casting revisions can change bolt patterns, oil passage routing, or sensor boss locations. Cross-reference the OEM part number or equivalent.
- Gather all associated replacement parts: head gaskets, main bearing set, rod bearings, freeze plugs, oil gallery plugs, head bolts (stretch bolts are single-use), and any seals or O-rings. Attempting to reuse old gaskets or stretch bolts is a guaranteed comeback.
- Prepare tooling: Engine hoist rated for the assembly weight, torque wrench (calibrated — not estimated), bore gauge, plastigage for bearing clearance verification, and thread chasers for all bolt holes in the new block.
- PPE and workspace: Overhead lifting means safety glasses, steel-toed footwear, and a clear floor path. This sounds obvious until an engine is swinging on a hoist over a cluttered bay.
Step-by-Step Procedure
1. Engine removal or isolation
Disconnect the battery, drain all fluids, label and disconnect wiring harnesses, fuel lines, coolant hoses, and exhaust. Support the transmission independently before separating the engine mounts. Photograph the routing of harnesses and vacuum lines — even experienced technicians lose time retracing wiring on reassembly.
2. Disassembly of ancillary components
Remove the cylinder head(s), intake and exhaust manifolds, oil pan, timing cover, and front accessories. Organize fasteners by component and location. Bolt lengths and grades vary — mixing them up causes thread damage or insufficient clamping force.
3. Remove the crankshaft, pistons, and connecting rods
If transferring the rotating assembly to the new block, inspect every component before installation. Check crankshaft journals with a micrometer against service specs. Inspect rod and main bearings for scoring, fatigue, or overlay wear. Replace anything questionable — the marginal cost of a bearing set is negligible compared to a second teardown.
4. Old block removal
Detach the block from the engine stand or vehicle. Clean the bell housing mating surface and any alignment dowels that will transfer to the new block.
5. Prepare the new block
Even a new block requires preparation:
- Clean all oil galleries with a rifle brush and solvent. Blow dry with compressed air. Residual casting sand or machining debris is an engine killer.
- Chase all threaded holes with the correct tap to remove any coating or debris from the threads.
- Install freeze plugs and oil gallery plugs with appropriate sealant (typically an anaerobic thread sealant — not silicone).
- Verify bore diameters and deck flatness. Trust, but verify — even new blocks occasionally ship out of tolerance.
6. Install the crankshaft and rotating assembly
- Lubricate main bearing shells with clean engine oil or assembly lube. Set the crankshaft into position and check bearing clearance with plastigage (typical spec: 0.025–0.065 mm / 0.001–0.0025 in — always confirm against the service manual for your application).
- Torque main cap bolts to specification in the correct sequence — typically from the center outward in 3 stages. For example, many inline-four applications spec 25 Nm → 50 Nm → 90° angle torque.
- Install pistons and connecting rods with ring gaps staggered per OEM instructions. Torque rod cap bolts to spec.
- Confirm crankshaft rotates freely by hand after all caps are torqued. Any binding indicates a clearance or alignment problem — stop and diagnose before proceeding.
7. Install the cylinder head(s)
- Place a new head gasket (dry — no sealant unless specifically called for by the manufacturer) with the correct orientation.
- Torque head bolts in the OEM-specified sequence and stages. This is typically a multi-step process: initial torque, second torque, then angle-torque. Using new stretch bolts is mandatory — they are engineered to yield once and cannot reliably achieve correct clamping force a second time.
8. Reassemble ancillary components
Reinstall the timing system, oil pump, oil pan, intake and exhaust manifolds, and all accessories. Apply sealants only where specified — over-application of RTV is a leading cause of oil passage blockage.
9. Pre-start checks and initial startup
- Prime the oil system before cranking. On engines with an external oil pump drive, this can be done with a drill-driven priming tool. Otherwise, crank the engine with injectors disabled until oil pressure registers.
- Fill the cooling system and bleed all air pockets. Trapped air causes localized hot spots that can warp a new head on the first heat cycle.
- Start the engine and immediately verify oil pressure (minimum 1.0 bar / 15 psi at idle for most applications). Monitor for any coolant or oil leaks under the vehicle and around all gasket surfaces.

Quality Assurance After Replacement
A completed assembly isn’t a completed job until it’s verified. Post-installation QA should include:
- Compression test: All cylinders within 10% of each other, and within the manufacturer’s specified range. On a fresh build, readings should be at or near the top of the service spec.
- Leak-down test: Less than 5–8% leakage per cylinder on a new assembly. Higher readings indicate a ring seating issue, valve sealing problem, or head gasket concern.
- Coolant system pressure hold: Pressurize to cap rating (typically 1.0–1.4 bar) and confirm no drop over 15 minutes.
- Re-torque check: Some manufacturers require a re-torque of head bolts after the first heat cycle. Check the service manual — skipping this step on applications that require it causes head gasket failure within the first 1,000 km.
- Road test or dyno run: Verify no abnormal noise, vibration, or fluid loss under load. Monitor coolant temperature stability through at least two full warm-up and cool-down cycles.
Avoiding Comebacks: What Separates a Reliable Build from a Return Job
The most common reasons for post-replacement failures have nothing to do with the block itself:
-
Reusing stretch bolts or old gaskets. This single shortcut accounts for a disproportionate number of head gasket comebacks. The cost of new bolts and gaskets is trivial compared to the labor of a second teardown.
-
Contaminated oil galleries. Debris left in the block during assembly destroys bearings within the first few hundred kilometers. Cleaning a new block properly takes 30 minutes. Replacing a spun bearing takes days.
-
Incorrect torque or sequencing. “Close enough” doesn’t apply to torque specifications. A calibrated torque wrench and the OEM sequence chart are non-negotiable.
-
Part mismatch. Even within the same engine family, revisions happen. Always verify the block casting number, deck height, and oil passage layout against the specific application. When sourcing aftermarket blocks, work with a supplier that provides application-specific cross-referencing — not just a generic engine family match.
-
Skipping bearing clearance checks. Plastigage takes five minutes per journal. It catches manufacturing variance, debris, or installation error before the engine fires — not after.
For shops and distributors handling volume work, maintaining a consistent supply chain matters as much as technical execution. Stocking common block configurations (or having a supplier that can ship quickly) prevents bays from sitting idle waiting on parts.
Conclusion
Cylinder block replacement is one of the highest-stakes procedures a professional shop performs. The technical process is well-defined — the difference between a successful outcome and a comeback is almost always in the details: proper inspection, correct parts, clean preparation, and verified assembly.
For workshops, dealers, and distributors sourcing cylinder blocks at volume, WideEngine supplies fully new blocks — available as bare castings or assembled short and long block configurations — with application-specific cross-referencing and bulk pricing. If you’re looking to streamline your parts pipeline and reduce sourcing risk, [reach out for a quote or browse the catalog to find the right fit for your operation